Monday, October 8, 2007

Some words on words in ballons.

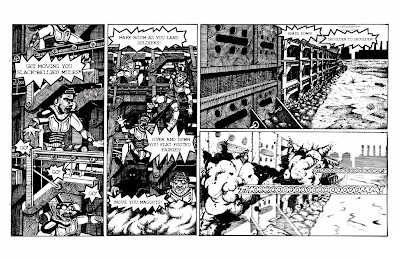
Everyone knows quality when they see it. A professional look is something that is not easily created, subconsciously approved of, and immediately recognized when broken with. It is much like reading facial expressions. Everyone is a master of knowing what facial expressions look like, and we all create them effortlessly everyday. After all, half our brains are devoted to analyzing faces. But try to fake a facial expression, or draw one, and everyone can see right through it. This is no less true for word balloons. We instantly recognize shoddy balloon work. And the funny thing is, that simple, natural looking word balloon is not as easy to create as you might think. 

The first thing that I learned in this process was this: Use vector graphics. You will revise your text, and consequently, your word balloons so many times it will make you head spin. I admit that, when it comes to my own art, my aversion to using a computer in conjunction with my hand art is very great. At the height of my madness I thought of hand lettering and ballooning all of my text. While I still like the idea of this, to even begin to pull it off, you have to have really polished all of your text before you even begin lettering. This requires you to be well ahead of schedule on your writing, and commits you to your text when your book is not even close to compete. In the end, I found myself choosing between my own bizzare fetish and a real increase in the flexibility I could have with editing my book. I think that the path that I chose is the right one for me, and for most people who are just getting started.

Also, give some thought to altering the balloons so that they are not simply ellipses. This can easily be done with the pen tool and Bezier handles. If you don't know how to use these then read the help section of your graphics software program, I can't very well describe it here.

Give some thought to what your characters are saying. How big should the balloons be? Should they be thicker? Thinner? Spiky? These are all important decisions. Context is everything. Make the balloons as emotive as the characters that are saying them and make the words inside match.

Also, experiment with different fonts. Find a font that might be similar to the one you are using, but more distressed. Then you can use that font for shouting. If you make a comic about marines, in space, there could be a lot of shouting.

See the following examples here:
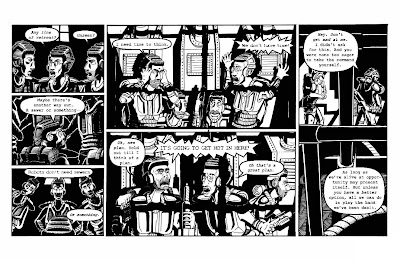
And also here:
Note that there is a place for hand lettered work, but it is usually in the tastefully placed sound effect. More on that.

Sound effects are an excellent place to throw around your hand lettering skills. I find that the best way to go about doing this is to trace the area that they need to fill from your drawing, then do the lettering on a separate piece of paper, and finish by giving its own layer in Photoshop so that it can be properly manipulated at will. The result is lettering that blends seamlessly with your art. 

I have way too many thoughts on this to contain them all in one post so we'll come back to this later. Right now I am really tired and I'm gonna go to bed early.

Tuesday, October 2, 2007

The most boring post ever.

I am about to blog about the frustrations I have had with the file formating from my book. It will be boring. If you proceed take note that I did warn you.

When you are formating a book, particularly a comic book, there are a few things that you should keep in mind. I know what you're thinking. I can hear you sitting there in front of your monitor, thinking to yourself, "I already know to make my files at least 300dpi for print. I already know about using CMYK instead of RGB. Why are you telling me this again?"

Well, I'm not going to tell you again. (Did you see how I really did anyway? I thought that was clever.)

This has more to do with things that you might think are common sense. All those little common sense things that you are supposed to remember, but always forget, because it's just too much to keep in your head at once. And then when I mention these things (and don't tell me you won't do this because I know you will) you'll think, "Well that was obvious. How could he miss that?" (I must take care not to bludgeon my readers with this point.) And you'll have already forgotten the point, which I so carefully made in my previous parenthetical statements, about how the mind gets cluttered and confused when formatting comics, as well apparently as writing blog posts. But now I shall break for a cup of tea. (I've been reading Salinger recently, can you tell?)

So where was I? Ah yes, common sense. Little things like, keeping in mind how big you book will be when you start creating your pages, and Oh yes, leave room for margins, gutters and bleed (trust me dear reader, when all is said and done you won't have left enough). In particular, if you draw pages, proportions 9 x 16, and then draw a cover that is supposed to bleed, you need to keep in mind that the margins will make the cover larger and change the proportion of the image. You might think that the change would be insignificant. Margins are very small, after all.

If you think this you have deceived yourself.

Because, and when you think about it rationally it really is only common sense, a book which has oblong proportions will be irregularly changed in proportion when you add trim to it. This isn't true of a perfect square, but a book that is as wide as 16x9 will change, and very quickly. All of a sudden I found that the image was going to have to be cropped. And not just a little bit. A lot. Enough that I would lose my favorite robot off of the back cover. And I know, dear reader, that I have more than once quoted Oscar Wilde about his little darlings, but this time it was more than that. (Also note that words are more easily edited than pictures.) On top of this it would then also off center the title and the symmetry of the characters on the front page. This was too much to bear. So instead I went with a look that suggests the classic wide-screen-movie-on-a-standard-television-set and added some black bars to account for the funny margins.

I hope the reader will not delude himself to think that I am now done talking about formatting my pages for I am really just beginning. See the next problem was that the printer could not print the book as widely as I had wanted and now I had to chose whether or not I wanted to change how the book would be printed.

You see comic books are made by folding a single large sheet of paper in half and creating four pages (think front and back) out of a single sheet. But to do this, especially with pages that are (proportionately reduced) thirteen inches wide would require very large stock indeed, which could not, if you must know, be run on a standard copy and saddle stitch machine. So to do this I decided to print the book stitched along the top so that the pages would open top over bottom like a calendar. In order to make this work I had to change how I set up the files...

Wait. I think I must recant what I said about just beginning to talk about formatting for it occurs to me that you have all given up by now. In fact no one will have made it far enough even to read this.

Oh well.

Maybe someone out there cares about file formatting...

It depresses the hell out of me, I swear to god.